


African Violets Part 2 – Propagation
go.ncsu.edu/readext?770911
en Español / em Português
El inglés es el idioma de control de esta página. En la medida en que haya algún conflicto entre la traducción al inglés y la traducción, el inglés prevalece.
Al hacer clic en el enlace de traducción se activa un servicio de traducción gratuito para convertir la página al español. Al igual que con cualquier traducción por Internet, la conversión no es sensible al contexto y puede que no traduzca el texto en su significado original. NC State Extension no garantiza la exactitud del texto traducido. Por favor, tenga en cuenta que algunas aplicaciones y/o servicios pueden no funcionar como se espera cuando se traducen.
Português
Inglês é o idioma de controle desta página. Na medida que haja algum conflito entre o texto original em Inglês e a tradução, o Inglês prevalece.
Ao clicar no link de tradução, um serviço gratuito de tradução será ativado para converter a página para o Português. Como em qualquer tradução pela internet, a conversão não é sensivel ao contexto e pode não ocorrer a tradução para o significado orginal. O serviço de Extensão da Carolina do Norte (NC State Extension) não garante a exatidão do texto traduzido. Por favor, observe que algumas funções ou serviços podem não funcionar como esperado após a tradução.
English
English is the controlling language of this page. To the extent there is any conflict between the English text and the translation, English controls.
Clicking on the translation link activates a free translation service to convert the page to Spanish. As with any Internet translation, the conversion is not context-sensitive and may not translate the text to its original meaning. NC State Extension does not guarantee the accuracy of the translated text. Please note that some applications and/or services may not function as expected when translated.
Collapse ▲Propagating an African violet can seem like an intimidating task. However, African violets, Saintpaulia ionantha, can be easily propagated by leaf cutting. This practice can save a favorite variety that may be aging or damaged or be used to increase an already thriving collection.
Supplies Needed:
- Established African violet plant
- Light potting soil medium (peat moss and perlite mix is recommended)
- 2-3” pot or container
- Sharp blade
- Label/pen
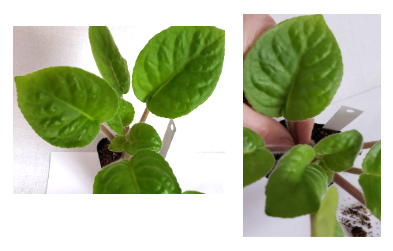
1. Select a healthy leaf from the stock plant. This leaf should be one that is vigorous and mature. Do not select a leaf that is too old as it may not root as easily. Pinch the leaf off at the base of the plant.
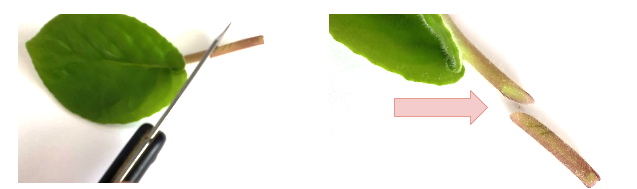
2. While the leaf is on its side, make a sharp, clean, 45 degree, angular cut leaving approximately ½ to 1 inch of stem remaining on the leaf. The angle should be front facing. This angular cut exposes more tissue which encourages more roots and plantlets to grow and develop.
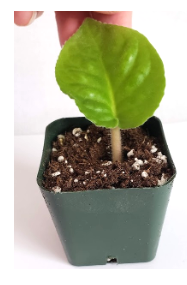
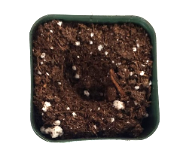
3. Loosely fill the pot with a light soil mixture.
4. Place the leaf directly in the soil.
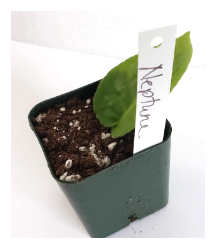
5. Once potted, label the leaf cutting with the variety name. Place in bright, indirect light with moderate temperatures. African violets are comfortable growing in the same conditions we enjoy indoors.
6. Water once a week or when dry to the touch. Do not overwater, this can cause root rot.

7. In approximately 12 weeks plantlets should be noticeable above the surface of the soil. Continue to practice the same care used to grow established plants. Allow plantlets time to grow larger and stronger before dividing. After approximately 4 to 6 months the plantlets should be ready to be divided.
8. To divide, gently remove the leaf cutting and plantlets out of the pot. Loosen the soil and remove the mother leaf from the babies, this helps separate the young starts. Separate the plantlets by wiggling them apart. Each plantlet should have a noticeable center with a few leaves and roots.
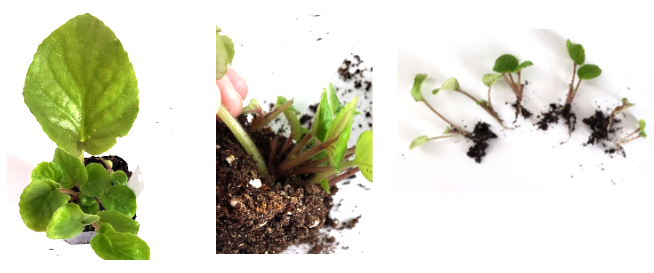
On average, an African Violet leaf cutting can produce from 3 to 10 starts.
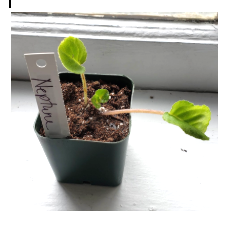
9. Fill a 2 ½ inch pot with a light soil mixture. Plant the new start. Do not pack soil.
10. Label and place in bright, indirect light. Water once a week or when dry to the touch.
11. Continue to care for the young plantlets with the same growing conditions and care as an established plant.
12. Once the plantlet grows too large for the 2 ½ inch pot, transplant it to a 4 inch pot using a light soil mixture.
Things to remember:
- African violets are susceptible to root rot due to a shallow root system. They do not like wet feet, it is better to keep them too dry rather than too wet
- African violets grow best in temperatures which we are comfortable
- Light is the key to blooms and foliage growth. A bright, indirect light (morning sun) is ideal
- Fertilizing regularly with a dilute solution of a balanced houseplant fertilizer (1/4tsp per gallon) will encourage blooms and strong foliage
Following these steps could help save and maintain a favorite variety of African violet or provide the opportunity to share new starts with friends and family. It is a simple propagation process that can yield many new plants to add to any houseplant collection.
Want to revisit Part 1: African Violets – Growing Tips